Home
Getting started
Bring your software with Docker
Core concepts
How-to guides
Monitor and debugging
Developer tools
Glossary
Documentation HPC
Secure Shell (SSH) keys are a pair of cryptographic keys used to authenticate a user on remote systems securely. They enhance security by eliminating the need for password-based logins, making unauthorized access more challenging. This tutorial will guide you through the process of creating and using SSH keys on both Windows and Linux systems, with a focus on using PuTTY for Windows users.
Using it on Qarnot can enable you to log in a running instance and use it as a worker.
Before we begin, ensure you have the following:
Open the Terminal
Generate the SSH Key Pair: Type the following command and press Enter:
ssh-keygen -t ed25519-t ed25519 specifies the ed25519 algorithm.Install PuTTY and PuTTYgen:
Open PuTTYgen:
puttygen.exe.Configure Key Parameters:
rsa (you can alos use EdDSA) is selected.2048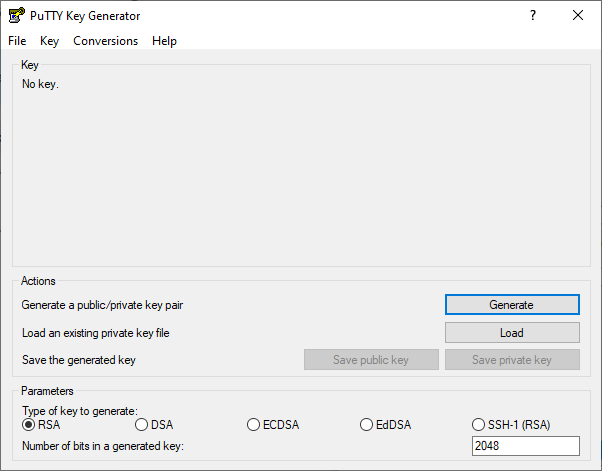
Generate the Key:

Save the Keys:
.ppk extension.id_rsa.pub or similar.Set a Passphrase:
After generating your SSH keys, you can connect to your cloud HPC cluster to manage your simulation.
During the simulation set up
DOCKER_SSH )ssh-rsa AAAABBBBEEEE333EZEZ ….
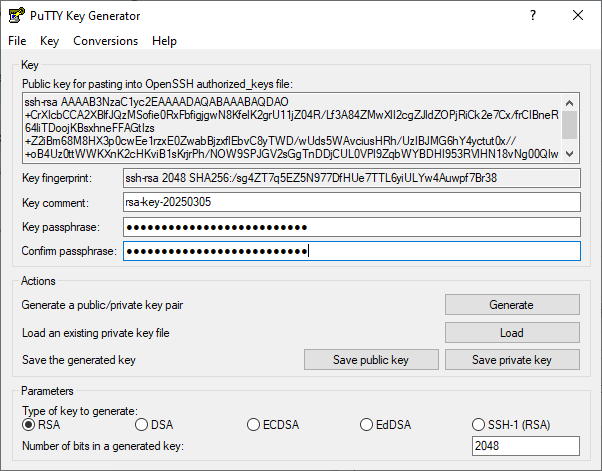
Get the SSH Command:
{port number}will be automatically filled with your simulation’s exposed port.Execute the SSH Command:
In addition to using docker-network-ssh profile, you must:
DOCKER_SSH with your ssh public key (which is typically ~/.ssh/id_rsa.pub, see help for Linux, Windows and macOS). This will be used to authenticate you without needing a password.DOCKER_SSH) in the authorized keys file and start the ssh daemon.Here is a basic example. The following script will print the ssh command that you should run to connect to the instance. You can also run it automatically into a sub-process.
Python
#!/usr/bin/env python

import qarnot

conn = qarnot.Connection(client_token = '<<<MY_SECRET_TOKEN>>>')
task = conn.create_task('ssh-example', 'docker-network-ssh')

task.constants['DOCKER_SSH'] = '<<<MY_SSH_PUBLIC_KEY>>>'

task.constants['DOCKER_CMD'] = "/bin/bash -c 'mkdir -p ~/.ssh /run/sshd ;" \
                               "echo \"${DOCKER_SSH}\" >> ~/.ssh/authorized_keys ;" \
                               "/usr/sbin/sshd -D'"
task.submit()

last_state = ''
ssh_tunneling_done = False
while not ssh_tunneling_done:
    if task.state != last_state:
        last_state = task.state
        print("** {}".format(last_state))

    # Wait for the task to be FullyExecuting
    if task.state == 'FullyExecuting':
        # If the ssh connexion was not done yet and the list active_forward is available (len!=0)
        forward_list = task.status.running_instances_info.per_running_instance_info[0].active_forward
        if not ssh_tunneling_done and len(forward_list) != 0:
            ssh_forward_port = forward_list[0].forwarder_port
            ssh_forward_host = forward_list[0].forwarder_host
            cmd = f"ssh -o StrictHostKeyChecking=no root@{ssh_forward_host} -p {ssh_forward_port}"
            print(cmd)
            ssh_tunneling_done = True

    # Display errors on failure
    if task.state == 'Failure':
        print("** Errors: %s" % task.errors[0])
        ssh_tunneling_done = True
Bash
#Note that you have to install the jq JSON processor package installed in order to run the script.

export QARNOT_CLIENT_TOKEN = "<<<QARNOT_CLIENT_TOKEN>>>"

TASK_UUID=$(./qarnot task create \
  --profile docker-network-ssh \
  --name "Hello World - CLI" \
  --instance 1 \
  --constants DOCKER_SSH='YOUR_SSH_KEY' \
  --constants DOCKER_CMD="/bin/bash -c 'mkdir -p ~/.ssh /run/sshd ; echo ${DOCKER_SSH} >> ~/.ssh/authorized_keys ;/usr/sbin/sshd -D'" \
  --format JSON | tee /dev/tty | jq -r '.Task')

LAST_STATE=$(qarnot task info --id "$TASK_UUID" | jq -r .[].State)
SSH_TUNNELING_DONE='False'

while [ "$SSH_TUNNELING_DONE" != "True" ]
do
	NEW_STATE=$(qarnot task info --id "$TASK_UUID" | jq -r .[].State)
	sleep 15

    if [ "$NEW_STATE" != "$LAST_STATE" ]
        then
        echo "Task state: $NEW_STATE"
        LAST_STATE="$NEW_STATE"
        sleep 120
	fi
     # Wait for the task to be FullyExecuting
    if [ "$NEW_STATE" == "FullyExecuting" ]
        then
        # If the ssh connexion was not done yet and the list active_forward is available (len!=0)
		sleep 10
		FORWARD_LIST=$(qarnot task info --id "$TASK_UUID" | qarnot task info --id "$TASK_UUID" | jq '.[].Status.RunningInstancesInfo.PerRunningInstanceInfo | .[].ActiveForwards')

		if [ "$SSH_TUNNELING_DONE" != "True" ] && [ "$FORWARD_LIST" != "[]" ]
        then
            	ssh_forward_port=$(qarnot task info --id "$TASK_UUID" | jq '.[].Status.RunningInstancesInfo.PerRunningInstanceInfo | .[].ActiveForwards | .[].ForwarderPort')
            	ssh_forward_host=$(qarnot task info --id "$TASK_UUID" | jq '.[].Status.RunningInstancesInfo.PerRunningInstanceInfo | .[].ActiveForwards | .[].ForwarderHost')
            	CMD="ssh -o StrictHostKeyChecking=no root@$ssh_forward_host -p $ssh_forward_port"

	            echo $CMD

	            SSH_TUNNELING_DONE="True"
		fi
	fi

    # Display errors on failure
	if [ "$NEW_STATE" == "Failure" ]
    then
        echo "** Errors **"
        SSH_TUNNELING_DONE='True'
	fi
done
Don't forget to delete the instance when you are done. Otherwise, you will be invoiced for time that you did not spend on computing. To do so, use Tasq or the SDK functionstask.abortortask.delete
If you want to use your own image, make sure to install the openssh-server package and to create the /run/sshd folder.
In addition, if you want to ssh as a user that is not root make sure that the ~/.ssh folder is owned by the user, that its private key is not readable by other users (rights should be 600) and that the user's password is set (otherwise ssh won't allow you to connect because it will consider the user incompletely set).
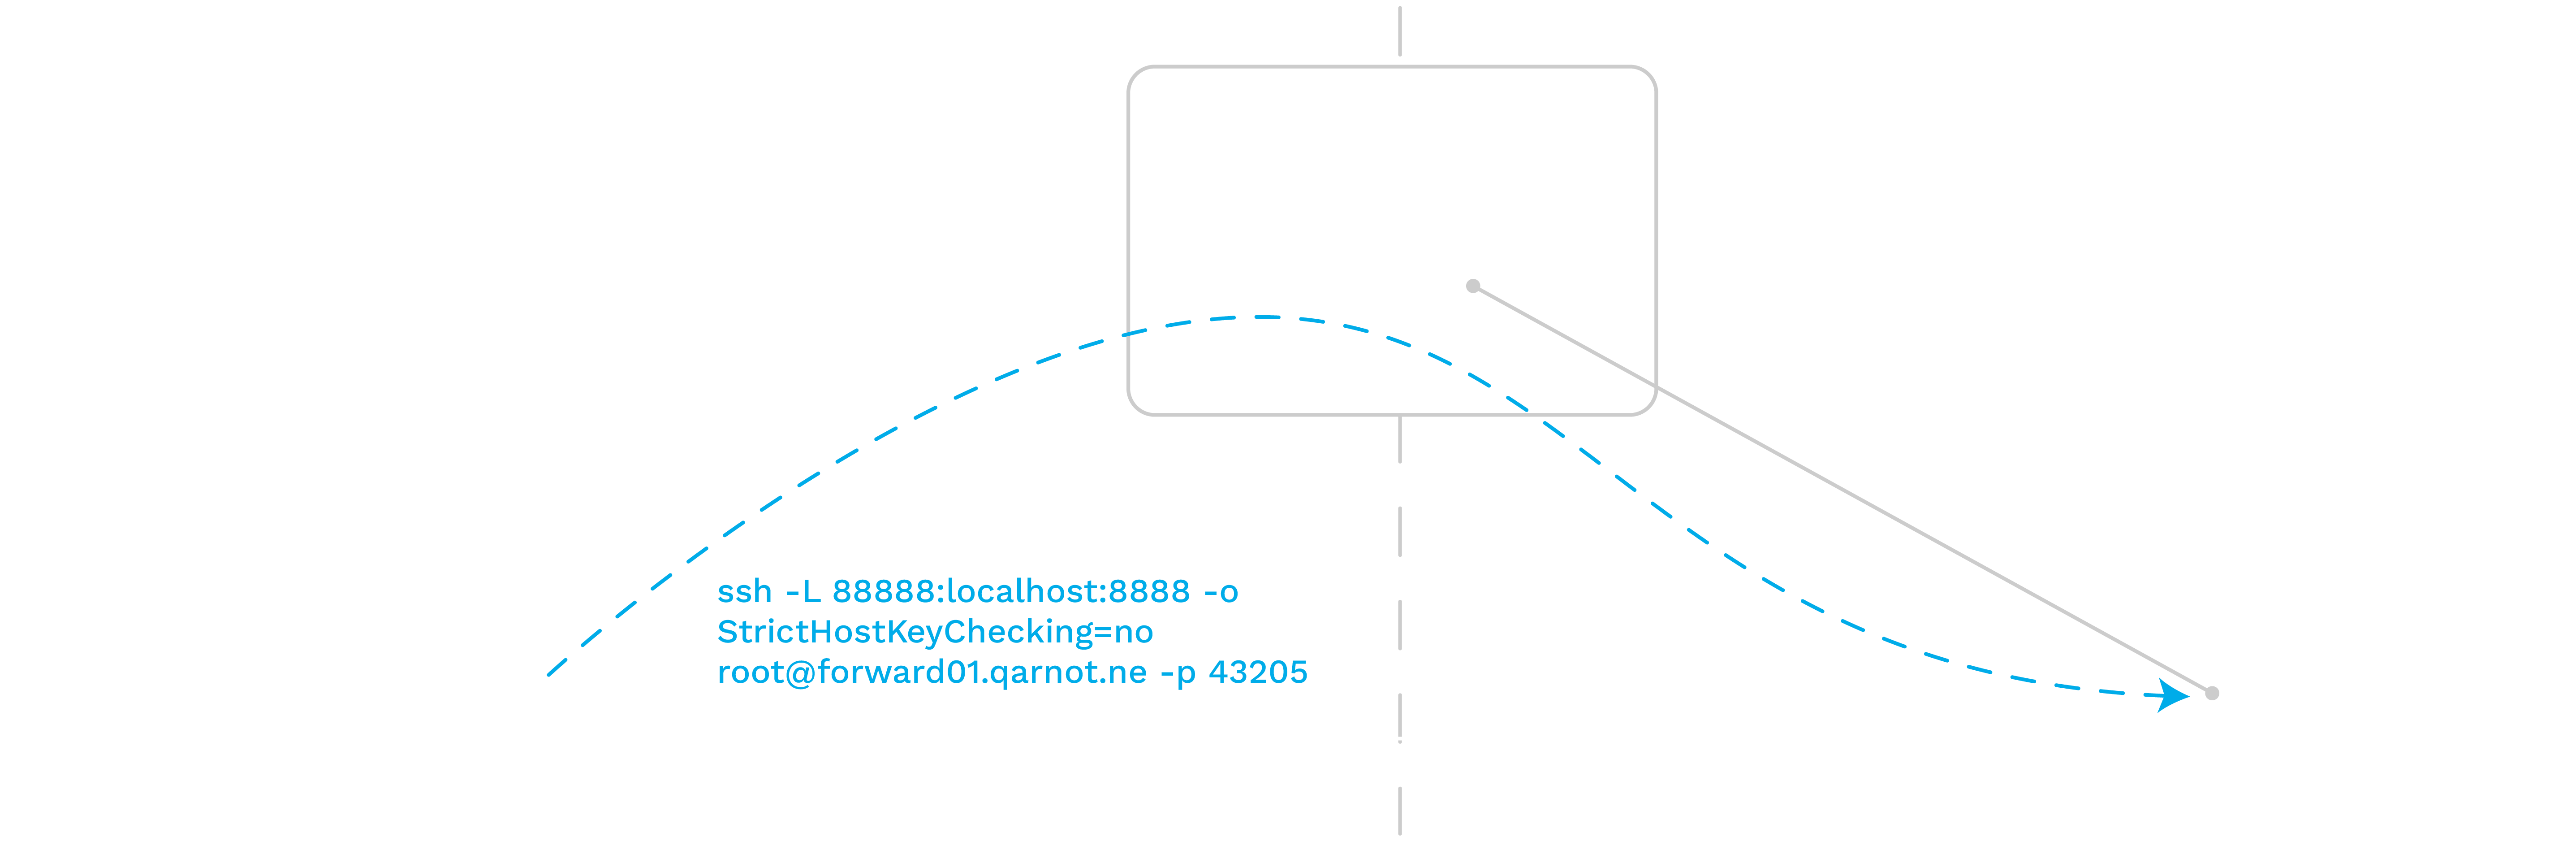
If you need to communicate with your worker through a specific port instead of just using ssh, you will need to create a tunnel between the instance's port and yours.
For example, if you are using a Qarnot instance as a runner for a jupyter notebook, you will need to access to the worker's port 8888 in your browser. To do that, you simply need to create a tunnel so that your port 8888 is redirected to the worker's one. The following schema shows the appropriate ssh command: